How to Transcribe Zoom Recordings Easily and Automatically


You finish a Zoom call, close the tab, and three days later, someone asks what the client actually agreed to. You scroll through your notes, find half a sentence and a question mark, and end up replaying twenty minutes of the recording to be sure. That's the gap a good transcript closes.
A transcript turns the conversation into searchable text your team can revisit anytime, whether you need to verify a deliverable, bring a new teammate up to speed, or pull quotes for a recap. An AI notetaker worth using records conversations, then creates summaries, action items, and a searchable record of the conversation that your team can use long after the meeting ends.
The Short on Time Version
Here's what to know before you decide how to transcribe your Zoom calls:
- Zoom's built-in transcription works, but with limits. It requires a paid plan, cloud recording, and the audio transcript setting enabled. Local recordings won't generate a transcript.
- Accuracy varies widely between tools. Independent testing puts Zoom's native transcription at 48% to 85% accuracy, while dedicated AI notetakers reach 75% to 96%.
- Otter.ai goes beyond a transcript. As a Conversation Intelligence Platform, it adds summaries, action items, speaker identification, searchable meeting history, and Otter AI Chat across all meetings.
- Recording consent matters. Laws vary by state and region (all-party consent states, GDPR, HIPAA, FERPA), so confirm your obligations before hitting record.
Why Transcribe Your Zoom Meetings
Automated transcription replaces manual notetaking with three concrete benefits:
- Stay present in the conversation. Taking notes by hand makes it hard to listen and catch nuances at the same time. A transcript captures every word so you can focus on the discussion.
- Share knowledge with teammates who couldn't attend. Searchable transcripts and summaries let anyone catch up in minutes.
- Build a reliable record across meetings. Instead of relying on memory, you have a searchable archive of every call, webinar, and interview. Teams using Otter report saving over 4 hours per week on post-meeting admin.
How to Transcribe Zoom Recordings Using Zoom's Built-In Transcription
This is the most direct method if you have a paid Zoom plan with the settings above configured.
What You Need Before You Start
Confirm these three prerequisites before you follow any of the steps below. Skipping them is one of the most common reasons transcripts don't appear after a meeting.
- A paid Zoom plan. Cloud recording and audio transcription typically require a paid Zoom account, such as Pro, Business, or Enterprise. Free (Basic) accounts generally won't have the same access. Check your plan on the Zoom pricing page.
- Cloud recording enabled. Only cloud recordings generate transcript files. Local recordings (saved to your computer) generally do not produce Zoom-generated transcripts.
- Audio transcript setting turned on. In the Zoom web portal, go to Settings > Recording and enable the "Audio transcript" toggle. If you're an admin enabling this for your organization, the path is Account Management > Account Settings > Recording & Transcript tab.
With all three in place, you're ready to transcribe. Here are the steps that you’ll need to proceed:
Step 1: Record to the Cloud
Start or join your Zoom meeting. Click "Record" at the bottom of the Zoom window, then select "Record to the Cloud." If screen sharing is already active, click "More" in the meeting controls, then select "Record."
Step 2: Wait for Processing
After the meeting ends, Zoom processes the cloud recording and automatically generates the transcript. Processing often takes longer than the meeting itself, and Zoom notes that during periods of high demand, it can occasionally take up to 24 hours. You'll receive an email when the recording and transcript are ready.
Step 3: Access, Edit, and Download
- Sign in to the Zoom web portal.
- Go to "Recordings" and select the relevant meeting.
- Click "Audio Transcript" to view the full text alongside the recording.
- To correct errors, click the pencil icon next to any line of text, make your edit, and save. Automatic transcripts often need editing to correct wording, spelling, and punctuation.
- Download the transcript as a .vtt file (a timestamped caption format). You can open VTT files in Google Docs or Microsoft Word. Separately, Zoom's live Full Transcript panel can be saved as a .txt file.
You may also be able to search across your recordings by keyword in the Recordings section of the web portal, which is useful when you need to find a specific discussion from weeks ago.
How to Use Live Transcription During a Zoom Meeting
Zoom can also surface text in real time during the call itself. Live captions are available to all paid Zoom customers. Free accounts may not have the same access.
There are two views to understand:
- Captions: Text appears at the bottom of your screen in real time, similar to closed captions on television.
- Full Transcript: A timestamped side panel that accumulates the entire conversation. You can save this as a .txt file when the meeting ends.
To use either view, first make sure the relevant features are enabled in your Zoom settings. On iOS or Android, live transcription access may appear under the Live controls during a meeting. Live transcription is not accessible through the web client.
Language support also varies. Zoom's automated captions cover English, Spanish, French, German, Italian, Portuguese, Dutch, Russian, Ukrainian, Chinese Mandarin Simplified (beta), Japanese (beta), and Korean (beta).
How Accurate Is Zoom's Built-In Transcription?
Zoom's native transcription is a serviceable starting point, but accuracy varies enough that it can't be trusted as the final record without review. A study by the University of Colorado OIT measured the gap:
- Built-in Zoom transcription lands at 48% to 85% accuracy, depending on configuration.
- Third-party notetakers processing the same Zoom recordings reach 75% to 96% accuracy.
Native Zoom transcription can improve in the right setup, but if you need higher accuracy for client-facing records, legal documentation, or detailed meeting notes, plan to review and edit the transcript or use a notetaker that handles summarization and search for you.
How to Transcribe Zoom Meetings With a Third-Party AI Notetaker
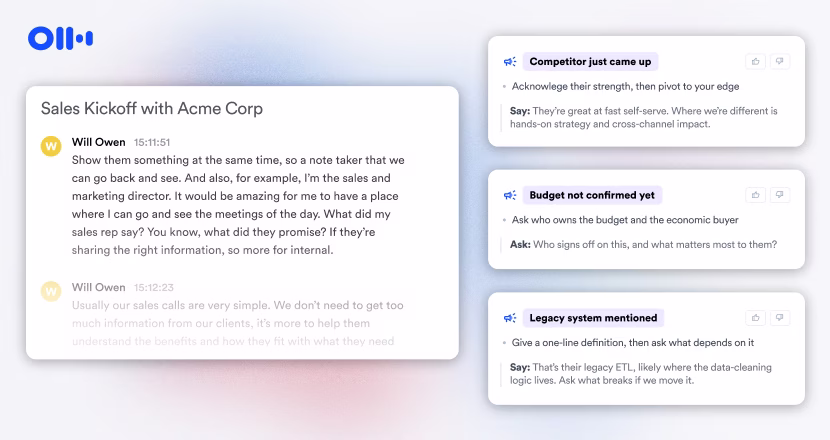
For teams that want higher accuracy and a record they can act on, a third-party tool picks up where Zoom's native transcription has limitations. Otter is a Conversation Intelligence Platform that’s used by over 35 million people, delivers 95%+ accuracy, and has captured over 1 billion meetings.
Beyond transcription, Otter provides a searchable record of what was said, what matters, and what to do next. For teams with stricter security or compliance needs, Otter's Enterprise plan adds live call coaching, CRMsync, and flexible data retention options, alongside SOC 2 Type II and HIPAA-compliant controls.
Connect the Notetaker to Your Calendar
- Go to Otter.ai and create an account.
- Connect your Google or Outlook calendar. This authorizes Otter to join the Zoom meetings you've set it to capture.
- In the dashboard, navigate to "Meetings" to set preferences for which calls Otter should join.
Once configured, Otter transcribes the conversation and generates a summary with action items after the meeting ends. You don't need to be the host if you're using Otter as a participant. However, some Zoom integrations require the host to connect to Zoom and may require a paid Zoom plan. For participants with free Zoom accounts, Otter is a useful alternative.
Review and Use Your Transcript
After the meeting, open the transcript in your dashboard. From there, you can:
- Edit any section by clicking the pencil icon (top-right on mobile, hover-then-click on web), then save.
- Search across your full meeting history by keyword, or ask Otter AI Chat specific questions about one or multiple past meetings.
- Share via an invite-only link with set permissions, or generate a public link for wider distribution.
- Export as TXT, DOCX, PDF, or SRT, or export the audio as MP3.
Otter also supports custom vocabularies, so product names, acronyms, and jargon get transcribed correctly.
How to Transcribe Zoom Recordings You've Already Saved with Otter
Older Zoom recordings sitting on a hard drive or in cloud storage can still be transcribed. Since Zoom transcripts are tied to eligible cloud recordings rather than local files, uploading a local recording to a third-party tool is often the best option. Here are the steps to transcribe previously saved Zoom recordings with Otter:
- Sign in at Otter.ai
- Upload your recording. Otter accepts audio (MP3, AAC, WAV, M4A, WMA) and video (MP4, AVI, MOV, WMV, MPG) formats.
- Wait for processing. An hour-long recording typically takes 10 to 20 minutes, and Otter can email you when it's ready.
- Review, edit, and export the transcript in your preferred format.
This method also works for recordings from sources other than Zoom, including webinars, conference talks, or interviews saved as audio files. Imported files are added to the same searchable history.
Quick Tips for Better Transcription Accuracy in Zoom Meetings
Whether transcribing with Zoom’s native feature or third-party solutions like Otter, the inputs matter to the quality of the transcription. Audio quality is one of the biggest factors in transcription accuracy, and a few adjustments make a measurable difference:
- Use a dedicated microphone or headset rather than your laptop's built-in mic. External microphones reduce room echo and background noise.
- Mute when not speaking. Background noise from multiple open microphones degrades accuracy for all participants.
- Record in a quiet environment. Reverberation from large rooms or hard surfaces introduces audio artifacts that confuse speech recognition.
- Review automated transcripts. Built-in captions and transcripts often need cleanup before you share them widely.
- Add custom vocabulary. Both Zoom and AI notetakers can let you add specialized terms, such as product names, acronyms, or industry jargon.
Start Transcribing Your Zoom Meetings
Zoom's built-in tools handle the basics only if you have a paid plan and cloud recording enabled. If you want more than a raw transcript, Otter provides summaries and action items. It also lets you search your meeting history. That makes it easier to check what a customer said three calls ago, bring someone up to speed without replaying every recording, or ask one question across months of meetings and get an answer quickly.
For instance, the shift from raw transcript to active record reshaped daily work at Aiden Technologies, an IT cybersecurity company that runs all client meetings on Zoom. Reps took manual notes while recording calls, and as the recording library grew, finding and sharing specific moments became cumbersome. After switching to Otter, transcription, storage, and search replaced the manual process. VP of Sales Laura Brown used transcripts to coach pitches without joining every call. In her words: "Just being conservative, 33% more effective, getting 33% time back."
Get a demo to see how Otter’s capabilities work best for your team, or try it free.
Frequently Asked Questions About Zoom Transcription
Is Zoom Transcription Free?
No. Zoom's cloud recording transcription typically requires a paid plan (Pro, Business, or Enterprise). If you're on Zoom's free plan, Otter's free tier is one way to get transcription without upgrading your Zoom account.
Can I Get a Transcript If I'm Not the Host?
With Zoom's native tools, only the host (or someone the host grants permission to) can access cloud recordings and transcripts. A third-party AI meeting assistant that joins as a participant can capture the transcript independently of host settings.
What File Format Does a Zoom Transcript Download In?
Post-meeting cloud recording transcripts download as .vtt files (Web Video Text Tracks), which include timestamps. You can open these in Google Docs, Microsoft Word, or any text editor. Zoom's live Full Transcript can also be saved separately as a .txt file.
Can I Transcribe a Zoom Recording I Already Have Saved?
Not with Zoom's built-in transcription, which only works with cloud recordings made through Zoom itself. To transcribe a local recording, upload the file to a tool like Otter that accepts audio or video imports. Note that Zoom's native audio transcription is limited to English, though live captions support a wider range of languages.
Related posts